
PROJECTS
My background is mainly in the fields of Engineering and Business Development. I am studying for a Bachelor's Degree in Mechanical Engineering and I have a year of coop experience in Sales and Business Development. This page details my work at L3 as a Proposal Administrator in 2017 in addition to my work creating a tool to cut tubes safely and effectively for my capstone project in 2018.
DNDO PROPOSAL
In 2017, I did a 6 month coop at L3 Security & Detection Systems where I wrote proposals for government contracts. During my time at L3, I had the opportunity to work on a proposal for the Department of Homeland Security's Domestic Nuclear Detection Office (DNDO). The DNDO was looking for a company to replace its vast number of Radiation Portal Monitors (RPMs) that detect dangerous nuclear material at the United States' ports of entry. After the first fleet of RPMs, installed after 9/11, were beginning to age, the DNDO needed to replace and update their monitors. The DNDO sent out a Request for Proposal (RFP) for companies to propose how they would go about replacing the RPMs. Since L3 Security & Detection Systems had RPM products, the company decided to bid.


The front page of the Radiation Portal Monitor Replacement Program, which specified that our proposal have about 23 "Tabs" or sections.
To begin, a colleague and I reserved a conference room for a month to serve our "War Room" and read through the RFP multiple times to figure out what needed to be done and when the key due dates were. We determined that the due date was in about one month. Tight, but doable.
The document specified certain sections that needed to be included in the proposal for submission. I broke a Microsoft Word Document into sections and pasted the title sections around the conference room. Between each, I left enough room for how long the section was estimated to be. This was no small document, and we estimated that it would be about 300-500 pages and would take up most of the room.
The next step was to take existing text from old proposals and to paste them where they applied in this proposal. This would relieve us from having to write the document from scratch. We also had company specialists write their section of the report, for example a Maintenance Engineer wrote the maintenance section. I was in charge of managing each person's progress on their section and getting each section in on time. We had sections from maintenance, engineering, installation, finance, and procurement.
In addition to getting the sections from each department, I was in charge of the formatting of the document as a whole. I was given a crash course in sales tactics of proposal writing by sales consultant hired by L3. Then we set to work integrating images throughout the document with captions that told their own story. This way, if someone were spacing out reading a wall of text, they could read the captions of the images and understand a basic idea of what the text was about.
Using these strategies, hard work, and long nights, we successfully delivered a document totaling over 500 pages to the DNDO before noon on the due date. We heard back from them later in my coop informing us that we had made it to the next stage of the process and the proposal had been a success.
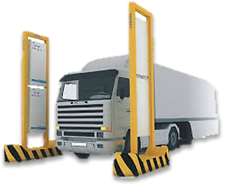
Radiation Portal Monitors can detect small amounts of radiation in a truck passing through the system.
Update (9/19/2018): The proposal was awarded to L3, along with Smiths Detection and Leidos, for a total dollar amount of $291.4 million. Assuming an even split, the proposal brought in almost $100 million dollars to L3 Security & Detection Systems.
GovTribe Link

NORTHEASTERN CAPSTONE
During my senior year at Northeastern, I had the opportunity to participate in a capstone project. Projects were assigned to various groups undergraduates in Mechanical Engineering and the students were to design, test, and build a working model of the project. The capstone project assigned to our group was a safe and vented rocket tube cutter for Northeastern's AIAA Chapter.

American Institute of Aeronautics and Astronautics (AIAA) is a club that focuses on teaching rocketry and competing in rocketry competitions. The club uses three materials for the airframes of their rockets: Blue Tube, fiberglass, and carbon fiber. When cut to size, these materials give off debris that can range from bothersome to toxic. The current system of cutting these materials was to wear Personal Protective Equipment (PPE) and use a hacksaw. They clearly needed a safer, more efficient way to cut these tubes and that was left to us.
The team began to brainstorm basic ideas of how to build a too that would confine the cutting area and therefore allow the user to cut the tubes to size without the use of PPE. We determined a transparent acrylic sheet would have to be used to enclose anything cutting the tube while still giving the user visibility. The tool then took the shape of a transparent cube.
From here, we needed a cutting method and a way to hold the tube in place. AIAA used a large range of tube diameters, from 1 inch to 8 inches. This was a substantial difference and greatly affected the holder design. Since we had determined for safety reasons that any blade involved would not be moving, the tube needed to be able to rotate but not move in any other direction.
Some team members had the idea of using live centers at each end of the tube to hold the tube in place. This had an advantage because the tube would be free to rotate but would not move in any other direction and could also accommodate for a large range of diameters. The issue was that this would have to be put at both ends of the length of the tube, making the tool much bulkier and harder to move. This would also need bottom supports on the bottom of the tube near where it would be cut.
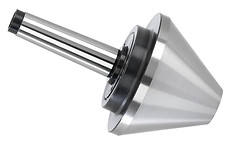
A live center is used in lathes and works because the conical shape allows for a small diameter tube to sit near the nose of the cone and a large diameter tube to sit near the base of the cone and can accommodate for anything in between

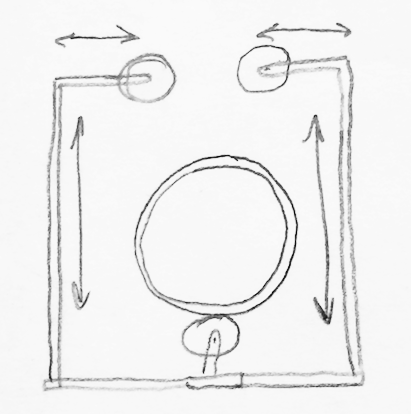
An early drawing I made showing an external holding system with internal roller supports and a rotary tool. The holes are for the tube fit through and the smaller hole is for a vacuum system

This idea would use a series of arms connected with hinges to clamp different tube sizes
This design was more rigid and only had the tubes moving vertically and horizontally
An early drawing I made showing an external holding system with internal roller supports and a rotary tool. The holes are for the tube fit through and the smaller hole is for a vacuum system
I began to draw some preliminary holder designs with rollers.
While researching ways of holding the bottom of the tube, I began to move toward rollers as a method of holding the tube. If the rollers could surround the tube had high enough frictional force, there would be no movement in any direction but rotational. This allowed me to come up with much more compact holding method that would go close to the cut site and leave the ends of the tube free, allow for any length tube, and create a more compact tool. I began coming up with ideas on how to clamp a range of different diameter tubes with rollers.
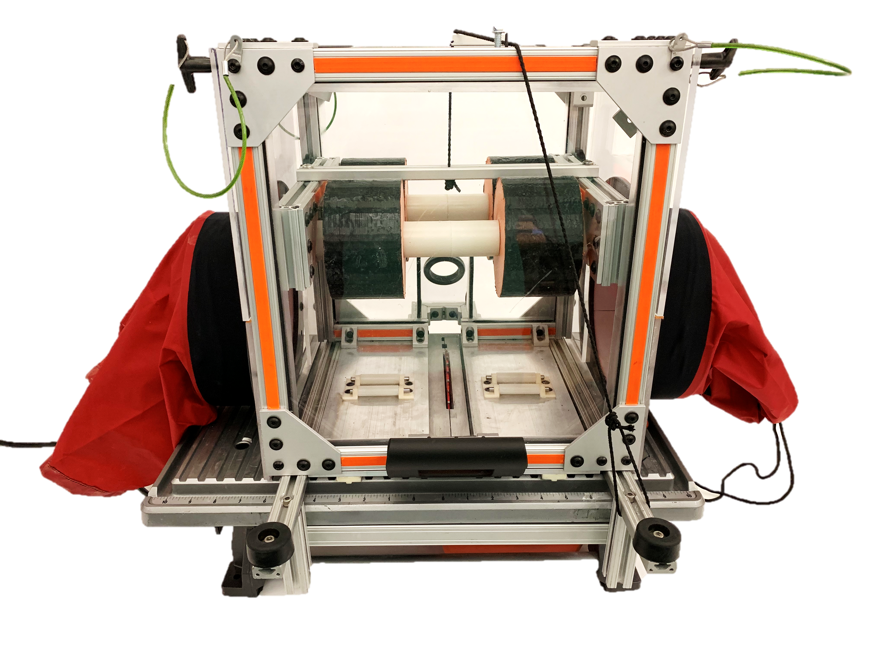
After discussing this with a team member, he suggested using the rollers that move vertically and horizontally, but to make the set of top rollers much larger so as enclose a large diameter tube without having to move horizontally. These two large rollers would be less than an inch apart, so that a 1 inch tube would not be able to slip between them. Thus we had a box design that had one set of rollers only moving vertically.
These rollers needed to have some length, as otherwise the tube would have pitch and yaw if the rollers were too short. I looked online and was only able to find 3 inch long rollers, so I figured I would use two rollers per shaft.

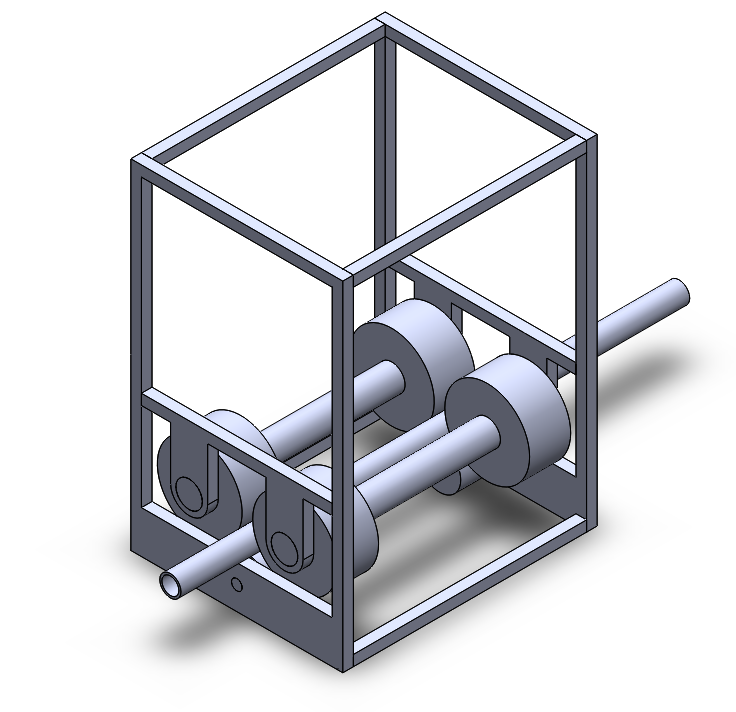
Creating the model in SolidWorks made me realize that I could make the holder double as an enclosure, making the tool even smaller.
The updated SolidWorks model designed for a table saw.
After modeling this design in SolidWorks, I discovered not only that there was a convenient space in between the rollers that would be able to fit a cutting device, but also that the boxy design of the holder could easily serve as the enclosure itself. After realizing I had essentially already had a basic design for the enclosure and the holder, I showed my teammates.
This new design worked perfectly with one of the cutting methods being discussed, a table saw. All the part would have to do was sit on top of the saw and the tube could be rotated, bringing material to the saw. I created an updated CAD model with the table saw in mind using models of existing 8020 Aluminum parts and rollers found online. This allowed us to move forward with building the design and selection of the cutting method.
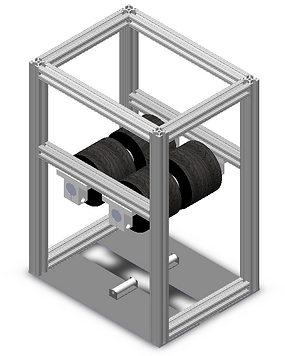
The original design of one centered bottom roller was found to be not practical, so brackets were designed and 3D printed to create a place for tubes as small as 1" diameter to rest. Another team member designed a vacuum port where a ShopVAC could be attached and run while cutting occurs. He also came up with a duct flange and drawstring design to enclose the different sized tubes while still allowing the ends to be outside the tool. Clear acrylic panels were used to enclose the rest of the tool, protecting the user from harmful debris.
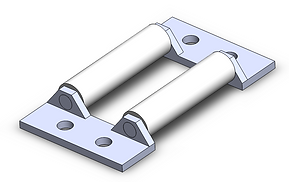
Updated bottom rollers
Another team member chose a suitable table saw, deciding on a 7" blade for our needs. Because the saw blade needed to penetrate the tube before any rotating could occur, the team decided to have the tool slide into the blade. The table saw also had groves in it, which allowed me to design 3D printed guides to be able to slide the tool while preventing the tool from shifting laterally. Stops were also put in place to prevent the saw from cutting the tool during the initial cut.
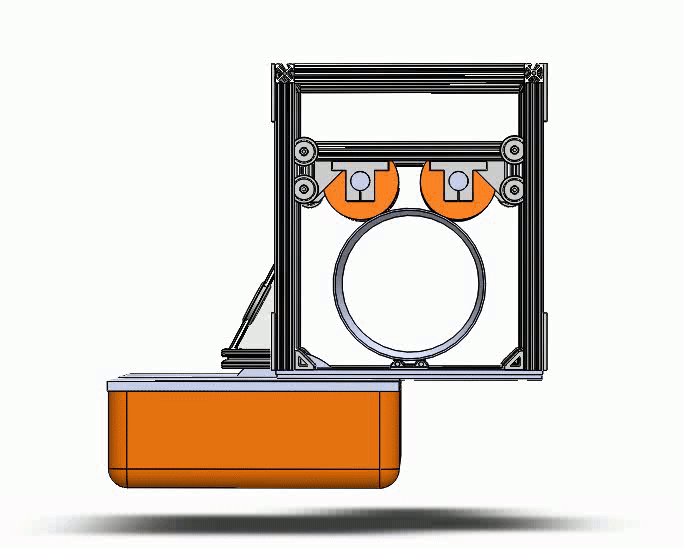
While the tool is in the starting position, a tube can be inserted into the tool and the top rollers will come down to adjust to its diameter. With the drawstring safely secured around the tube and the cutting surface fully enclosed, the table saw can be turned on and the tube pushed into the blade. The tube is then rotated until the cut it finished and brought back to the starting position.
The initial cut of the tube begins with the user pushing the tool (top structure) into the table saw. In this animation, the table saw is moving, but in reality the tool will move into the table saw.
In early 2019, the team trained members of Northeastern AIAA to use our tool. Our tool has been installed in the AIAA lab and has been in use since this training was completed. With its fast and accurate cutting, the tube cutter has been able to save members of the club countless hours and has allowed them to focus on more tasks in a shorter time span. This tube also has had the benefit of protecting hundreds of students from potentially harming themselves by using more dangerous methods of cutting that were being used in the past. I am very proud to have played a role in making a useable and safe product and improving one of Northeastern's largest organizations.
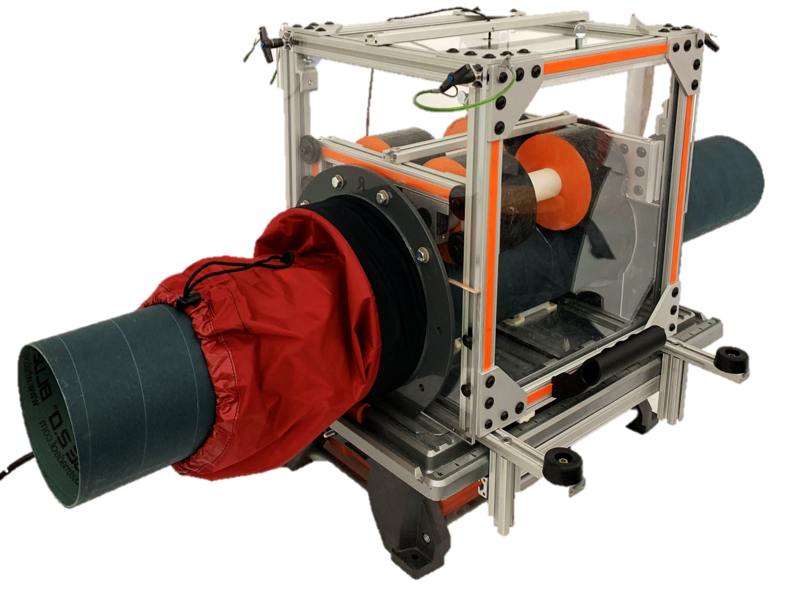
Final Product
Design Evolution
Video of the tool in action